Layout design – different voices – the art of presentation

Over the next few weeks, I want to explore some ideas about layout design.  There are a number of interesting voices in the railway magazines and on the internet, with practical ideas that are can be of interest and help in layout design.

But first I want to head for Australia.  The Prince Street Terminal blog recently drew attention to an interesting narrow gauge layout:

Years ago I came across photos of the Totternhoe Mineral Railway exhibition layout and instantly “fell in love” with their approach to layout design and the space it occupies. In line with what I’ve been trying to explain above, its builders determined the arrangement of track and scenic elements within the overall scene and then wrapped beautifully flowing benchwork around the whole thing. Trying to make such a free-flowing design structurally stable would be very difficult for a layout that stays home and even more so for one that is expected to be portable and to attend exhibitions. To respond to those practical demands they developed a very innovative approach that feels so beautifully architectural in its very nature and just so elegant: They perched their beautifully flowing scenes on top of regular, rectangular, frames and then painted everything flat black. The layout is carefully lit to focus the lighting on the scenes. In many ways the presentation style draws a lot from theatre design and it just works so well. The lighting focuses the viewer’s attention squarely on the layout itself without any distraction away from the show. Furthermore, the whole layout, not just the track, appears to meander through its environment. A viewer seeing the layout for the first time can instantly relate to it and the builder’s intentions with little explanation and that’s the essence of good design.

The pictures below have been taken from the Gn15 (minimum gauge modelling) forum.  More can be found at  http://forum.gn15.info/viewtopic.php?t=3334

aus_2 aus_1

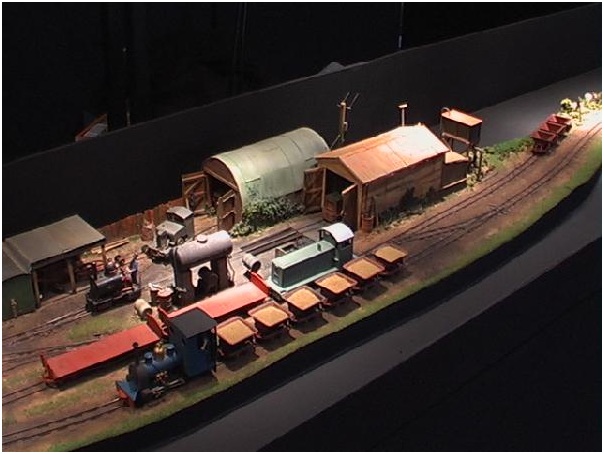
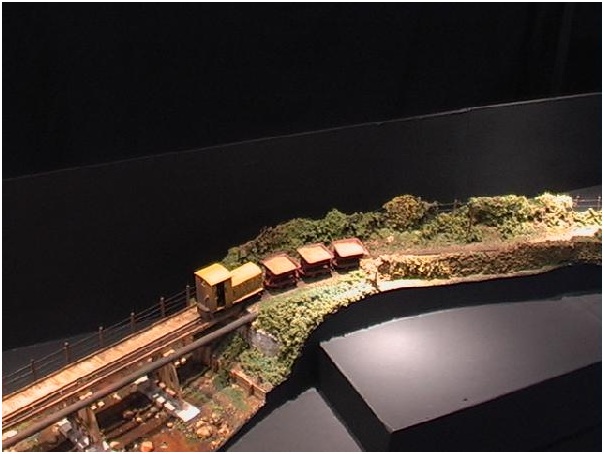
I like the concept.  Flowing curved benchwork is good to look at, and allows the layout to flow with the changing size and shape of the railway and its surroundings.  However, it is not easy to make, and even less easy to incorporate odd shaped baseboards into our club modular systems.  The concept of a flat black background also eliminates any problems with backscenes, square corners to scenes, how to get the train into and out of the scenic section, and all those problems that we have developed scenic tricks to hide.  90% of a fine layout is in the quality of modelling.  However, what sets it all off is the presentation, or perhaps the ‘theatre’ of the model.  This approach achieves this only too well…

Posted in Layout design | Tagged , , | Leave a comment

ESNG meeting – 7 November 2013

I can’t tell you anything about what went on at this meeting, as I am sitting in a sunny if cold Beijing.  But here’s a picture of the Forbidden City, and a large scale model of a Chinese high speed / bullet train.  Both taken last year, I’m afraid.

forbidden city   beijing bullet

Posted in ESNG meetings, Out and about | Tagged , | Leave a comment

Extreme ‘ERIC’?

extreme_eric

With all the Norfolk and Southern heritage livery units in place. (Photo N&S).

I’m still waiting for the Lehigh Valley heritage unit to come out in ‘N’ – then I may be tempted by a modern diesel.

Perhaps we could fill ‘Eric’ with American locos at Stuttgart this year????

Posted in ESNG, Prototype | Tagged , , | Leave a comment

Jon’s modules – PECO lash up

Sitting looking at a sunny but smoggy Beijing morning, here are a few ideas on PECO track.

The PECO range of points offer a consistent geometry and make track planning and laying all too easy.  However, one track configuration caused problems on my second board.  The diamond crossing that carries a siding and the main short line is fed by two points, as the picture below shows.

crossing layoutThe PECO fine scale code-55 range has a lovely short crossing, that would fit between two large or medium radius code-55 points, all fitting perfectly.  At least, until one wires it up (oh no, not more wiring problems).  The crossing is live frog, and the frog polarities need to be changed according to the leg that is carrying the train.

Now, the code-55 crossing is ready wired, with four connections for the four crossing frogs.  As I thought about it, I realised that although a live frog crossing can be linked to the point frog polarity for, say, a double junction, the polarity of the crossing will depend on the setting of the two points, and cannot be unique.  To use live frogs, one needs to have an additional switch for the crossing (or go DCC, which I’m not.)

Of course, there would be no problem with a dead frog crossing.  And PECO make a code-80 universal short crossing.  Using the heavier rail is not a problem – if anyone notices it, remind them that prototype crossings often had heavier rail than the track on either side, due to the heavy wear at a diamond.  But just to annoy us, the geometry and angles of the universal range is slightly different from the code-55 fine scale range.  So although code-80 joins well with code-55 with a normal fishplate, perhaps with a tiny bit of tidying with a file, the geometry doesn’t work.

Not to be denied, I got out all my points and tried to get the geometry to work.  I soon came up with the lash up shown below.  The code-55 small radius point has a larger frog angle than medium and large radius points.  If I used a short Y point on the other leg of the diamond, the angles were spot on through the junctions.

peco lash up

There was one catch, of course.  The large radius / short Y point combination gave a track spacing of about 40mm.  This was easily reduced to 27mm or so (the PECO standard spacing) by taking one sleeper and about 10mm of track off the two points and the crossing.  Take care doing this – take too much off and the short frog rail will probably have inadequate support and drop out (as my first crossing did – fortunately I had a second one in the rail box.)

The end result is not only one with the correct geometry, it will also look interesting on the layout – breaking away from the standard PECO geometry.  Now to lay it and wire it up.

Posted in Jon's layout ramblings | Tagged , , , | 1 Comment

Track cleaner idea?

One to keep you amused as I jet off for a couple of week’s work in Beijing…..

Well, it’s different!  (Click to enlarge)

vacuum

Posted in Prototype, Weird and wonderful | Tagged | Leave a comment

What to do with snow

Reading an album of railroad photos around Buffalo, I came across the following fascinating fact.

“One of the major headaches of snow removal in the ‘old’ city, was finding a place to plow-shovel-blow the snow. The streets were narrow and usually lined with cars. Only ‘old sol’ and a rising temperature took care of that problem… unless the NYS National Guard was called in to haul it away. In the aftermath of the Blizzard of ’77, the news media reported that the snow was being loaded into railroad cars and shipped south!”

This approach was used to clear the extensive railroad yards, where trains of snow were sent off for a round trip to Florida! Perhaps our railways could do something similar with the wrong kind of leaves/snow/badgers?

And how would you model it – and convince people that snow was a realistic load for your gondolas?

Posted in Prototype, Weird and wonderful | Tagged | Leave a comment

Jon’s modules – stop press – first train!

first_run

Running with electricity and not string, the 9342, a Conrail SW9, travelled all of 600m on both main line tracks!

Moments like this encourage me to complete the wiring on this first board….

Posted in Jon's layout ramblings | Tagged , , , | Leave a comment

Jon’s modules – wiring the point motor switches

You will have probably realised that wiring is not my strong point.  I use as many terminal blocks as possible for joints and to manage the wiring.  I also probably use thicker wire than I need to – 3 amp twin flex.  That’s my civil engineering background of overdesign.  But I have also found wiring flex to a small DPDT point motor switch is not easy at my time of life.

point_switchSo I came up with this little fix.  The switch is recessed into the facia, and is mounted on a 3mm ply plate glued to the back of the facia.  A terminal block takes the main supply into the switch.  The block is then connected to the switch with small diameter phone wire.  Easy to solder to the switch and the soldering can be done on the bench before installation to the layout.

Posted in Hints and tips, Jon's layout ramblings | Tagged , , , | 2 Comments

Berkshire Area Group Mega-running day

Dave let me know about this running day and says…

We have a mega running day on Saturday 9th November. we should have 24 modules in the scout hall. It’s about an hour’s drive from you to us – though it is Saturday! We should be running by 11.30 and finish by 17.30. If you want to bring your models you might get a bit of running time but it won’t be very long.

Looking at the N-gauge society web-site, here are a few more details…..

We are holding our 2nd Mega running day on the 9th November 2013, the event will be open to members of the N gauge Society.

The 1st Mega meet was a great success; photos can be seen at: http://bagladdies.weebly.com/mega-running-day.html.  The 2012 Mega layout was 29ft X 17ft, making a total running distance of 10.62 miles!!

This year we intend to add a further two modules making the layout 29ft X 21ft, adding an additional mile, making a total of 11.5 miles.

Location: Scout hut opposite Norreys Church, Norreys Avenue, Wokingham, RG40 1UU

The meet is for N-gauge Society members, but I’m sure with our links with Berkshire, the ESNG would be welcome.

Posted in ESNG, Out and about | Tagged , | Leave a comment

Who was speeding on AlpenBahn?

alp speed

ESNG 2006 exhibition….

Posted in ESNG | Tagged , , | Leave a comment